For the past few weeks, I’ve been learning the ins and outs of google photos to continue our segment on how to organise your photos. At first, the task of copying years of images and videos to one place seemed daunting to me, but I picked up some helpful tips along the way. Below I will share with you how you can get started, some helpful tips and a few great features that you should totally use.
How To Get Started With Google Photos
- The first step is to make sure you have a google email address that you use on your device (eg. [email protected])
- Next, you need to download the google photos app onto your device and/or computer desktop or where you have your photos stored
Backing up from your phone
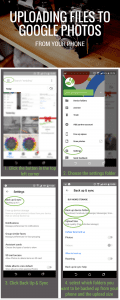
- Tap the burger button in the top left corner (three horizontal lines)
- Choose settings
- Click back up & sync
- Select the folders you wish to always back up from and the upload size
Back up manually from your computer or hard drive
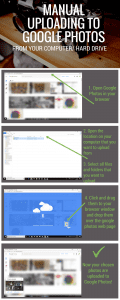
- Open Google Photos in your browser
- Open the location on your computer that you want to upload from
- Select all files and folders that you want to upload
- Click and drag them to your browser window and drop them over the google photos web page
Automatic back up from your computer or hard drive
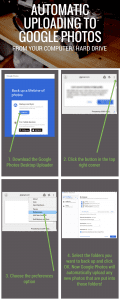
- Download the Google Photos desktop uploader
- Open the app and click the button in the top right corner
- Choose the preferences option
- Select the folders you want to back up and click OK.
Now Google Photos will automatically upload any new photos that are put into those folders!
So now you have all your photos uploaded and your settings all tweaked, let’s take a look at some of the extra features you will find in Google Photos.
Features:
Settings:
In the settings menu, you can find all sorts of options to help you personalise your setting to suit you. You can manage your preferences for notifications, Geo-location on photos, what folders to back up and much more. To find the settings in your Google Photos account, follow steps 1 & 2 in the “Backing up from your phone” section at the top of this page.
Albums:
The albums feature in Google Photos has many great features, we will explain a few of them below.
- People & Pets: This is a section where you can go in and name the faces that the app has picked up in the photos you’ve backed up. Once named, the app then groups any photos or videos with that same face together. This means you can then type a someone’s name in the search bar and it will bring up every photo and video featuring said persons face. Google Photos will also pick up animals faces too, which comes in handy. Pro tip– Search for two people and it will show photos and videos with the two people searched.
- Places: This is where your location comes in really helpful. The app will pick up the location set on each image and group photos taken at the same locations.
- Things: Google Photos will use this section to group photos alike, such as things like food and recipes, weddings, birthdays, Christmas, cars, storms, bowling, snakes etc.
- Videos: All of the videos that are backed up or made and saved with the assistant will be easy to find right here.
- Collages: Any collages you make using the assistant in the app can be found in this section. Likewise with the animations and movie sections.
- Photos on device: This part will display all of the albums on your device, whether they are selected to back up to the app or not. This doesn’t mean they have been backed up though.
- Albums: Here you will find all of the albums you’ve made in the app.
Sharing:
The sharing option in Google Photos allows you to share just one photo on its own or you can create a shared album to put multiple photos in to share. In a shared album, you can decide on whether you want others to be able to add their own photos to the album or not. This would come in super handy for an event like a wedding. You could have your guests upload all of their shots to the one album for you to have.
Assistant:
Google Photo’s assistant will occasionally send you suggestions of collages, movies, animations, suggested albums and more. If you click on the Assistant toggle and scroll down, you’ll find many suggestions. After you decide you like a suggestion all you have to do is hit save and it will create and save it for you. Another option is to create your own projects under the create new heading. The assistant is one of the best things about Google Photos and it’s mind blowing how much work it actually does for you automatically!
Searching:
This is what Google is known for. The extent of the app’s search powers is beyond belief, to say the least. It’s probably my favourite feature in the entire app. you can search anything and it will find it. Things like selfie, photos from last weekend, cars 2013, names, objects, events, holidays, the list is endless.
An example of this would be when I was trying to describe a drawing to a friend of mine that my daughter had drawn last year and I had taken a photo of it. I thought, ” I might see if google photos can pick it up for me”. So I typed in the search bar ” drawing 2017″. In a matter of seconds, it displayed all of the photos with drawings in them from 2017. I found the photo I wanted in less than a minute. No amount of explaining will do this feature the justice it deserves, you’ll just have to try it out for yourself!
I think the most exciting thing about Google Photos is that every time you open it up, you’re finding more things to explore and create with. It’s not just a storage centre, it’s everything you need and more, all in one spot! Let us know in the comments what your favourite feature is if you already have this app or if you are only now discovering it’s extraordinary powers, tell us what you’re most excited to use on it.
Check out our blog for more helpful information, tips, tricks and more!


